Analyze on a Whiteboard
Whiteboards in Condens are one type of Artifacts. The infinite Whiteboard gives you more freedom and possibilities to analyze and share research data. You can start with an empty board, add research Highlights, and cluster data to discover patterns with affinity mapping.
In addition, Whiteboards help you create typical UX Research deliverables like user journey maps or empathy maps connected to research Highlights easily.
Using Whiteboards
To create a new Whiteboard, go to the tab in a Project and click , or use the sidebar on the right and click to Add new Artifact.
In both cases, the next step is to select between starting with an empty Whiteboard or with a template for affinity mapping or user journey maps, for example.

If you select an empty Whiteboard, you can start by giving it a title. You can also add a cover image and a summary. The summary can be written manually or AI-generated—just click once you've added some content to the Whiteboard.

Next, you can bring the Whiteboard to life by referencing evidence such as , Clusters, text, and more. The easiest way to do so is to Open sidebar view. Simply click on its icon in the sidebar or the icon in the upper-right corner to switch your Whiteboard from the center view to the sidebar.
Adding data to the Whiteboard
When opening the Whiteboard in the sidebar, you can easily drag any research data to the Whiteboard. This view is compelling as it allows you to apply filters, sort research Highlights by contextual information, and only add relevant data to the Whiteboard.
Besides research data, it's possible to add text, images, lines, Clusters, and rectangles to any Whiteboard from the toolbar located on the left. You can press / on your keyboard to quickly open the toolbar menu.
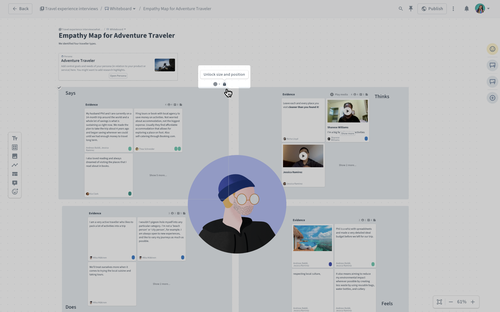
Tip: You can lock elements to preserve a layout while keeping all flexibility to edit information or add Highlights.
Clusters
A Cluster is a way to visually group related insights, observations, or notes into meaningful themes, allowing you to:
Group related information together for better context.
Highlight emerging themes or recurring ideas.
Collaborate with your team to interpret findings in an intuitive, visual format.
As you drag research evidence close together on the Whiteboard, a Cluster will automatically be formed. You can move research evidence in and out of Clusters as your analysis evolves.
To eliminate manual work, you can also create Smart Clusters that automatically populate their content based on the filters you set.
Find similar Highlights for Clusters
AI can help you identify similar Highlights to add to a Cluster based on their semantic similarity.
In your Whiteboard, click
in the upper-right corner of a Cluster, or open full view of a Cluster and go to its bottom.

Click
Find similar Highlights.
Bulk-select the most pertinent recommendations: Review the suggestions generated by the AI and choose the ones that are most relevant to your Cluster.
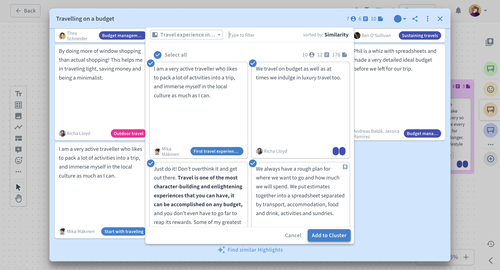
Click on when happy with your selection.
Summarize Clusters with AI
To get a quick overview of a Cluster's content, you can manually add a description or get an AI-powered summary. Simply open a Cluster and click the icon in the upper-right corner to generate.
Navigating the Whiteboard
To move around on the Whiteboard, click on the Hand icon on the left side of your Whiteboard. You can also hold the space bar temporarily switch from the arrow to hand control to navigate.
Regardless of your position on the Whiteboard, you can press / on your keyboard to quickly open the toolbar menu and start typing to find the exact element to add to the Whiteboard.
Analyzing in the correct resolution level
Zoom out to discover how mapped Clusters are connected and spot high-level trends. Or zoom in and go into detail on the infinite Whiteboard.
Tip: You can use shortcuts or hold while using the trackpad/mouse to speed up zooming in and out.
AI-powered affinity mapping
Auto-clustering lets you synthesize research Highlights by sentiment or themes with the help of AI.
Use it to surface insights in seconds while still having control over the outcomes by querying your research data, refining Clusters, and reapplying AI to further break down Clusters.
Once you’ve added your Highlights to the Whiteboard, click the
icon. This can work on all or a selection of Highlights on a Whiteboard.
Choose between the Auto-clustering options:
Sentiment: Automatically group Highlights as positive, negative, or neutral.
Themes: Describe the themes, patterns, or answers you’re looking for.
Condens will automatically cluster data to help you make sense of it.
Reapply Auto-clustering to modify your descriptions. Iterating will help refine the insights you find or dig deeper into them.
Tips and examples
Theme descriptions can be structured as questions or statements and be as detailed as you like—ranging from open-ended and exploratory to more specific and contextual. You can experiment with combining these approaches as you reapply Auto-clustering, helping you surface the insights you’re after. Here are some examples:
“I’m trying to learn about pain points customers have”.
“What are the main suggestions for improvement, pain points, and areas of satisfaction mentioned in the feedback on this feature release?”
“These highlights are from usability tests. Group the findings into areas of confusion, smooth interactions, and overall task success.”
“These highlights are related to users’ motivations, frustrations, and product interaction habits. I want to understand what are the common behaviors, recurring pain points, and key motivations.”
“Acme Corp. is a B2B software company specializing in workflow automation tools for mid-size businesses. We’ve collected feedback on the core product, which streamlines project management. Identify user expectations, frustrations, and feature requests to find areas for improvement and drive feature adoption.”
Play around with different levels of detail until you find what works best for your research style and goals.
Collaborate with your team on a Whiteboard
All active research roles (Admins and Researchers) can work on Whiteboards simultaneously, as it's made for real-time collaboration. In addition, all other roles, like Stakeholders, currently can view shared Whiteboard and comment.
Sharing Whiteboards
Like all Artifacts, you can share or publish your Whiteboard with just a few clicks. You can also select only a part of the Whiteboard and turn this selection into a new embedded Artifact that can be shared separately.
Create Whiteboard Artifact Types
You’ll find an initial set of Artifacts in your account, each with a different purpose. There are two different styles: page-based and Whiteboard-based Artifacts. Learn more about Artifact Types.

