- What is the Condens MCP Server?
- Connect Condens to Claude and ChatGPT
- Connect Condens to a custom MCP client
- Stage 1: Admin enables the MCP on workspace-level
- Stage 2: Each user authorizes the MCP client for their account
- Creating a dedicated user account to connect with MCP server
- Stage 1: Create a dedicated Viewer account
- Stage 2: Admin configures the MCP client
- Stage 3: Each user authorizes the MCP client
- Redirect URI wildcard support
- Removing or deactivating the MCP client
What is the Condens MCP Server?
MCP (Model Context Protocol) is an open standard that allows AI tools to securely connect to external data sources. The Condens MCP Server implements this protocol, giving any MCP-compatible AI assistant or your own LLM infrastructure read-only access to your published research.
This means you can:
Ask questions about your research in natural language and get instant answers
Query across multiple Condens workspaces simultaneously
Combine Condens with other MCP-compatible tools (Notion, Jira, Linear, etc.) in the same conversation.
Important limitations
Only published Artifacts are accessible through the MCP server
You only see workspaces, projects, and Artifacts you already have access to in Condens
AI cannot create, edit, or delete any content in Condens
You can use the MCP server to connect Condens to any LLM that suports this connection. You must have a paid plan with Claude (Pro or higher) or ChatGPT (Plus or higher) to use MCP servers with these AI assistants.
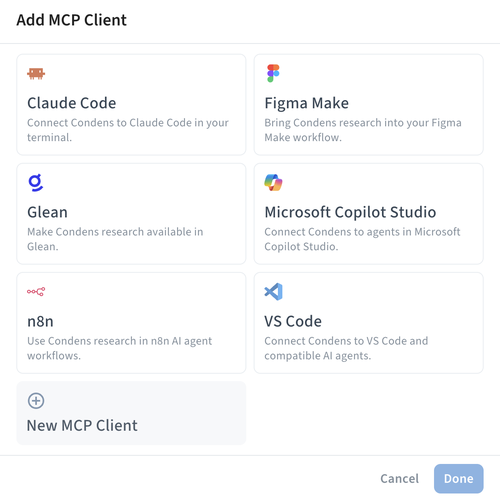
Connect Condens to a custom MCP client
Custom MCP clients in Condens span across a variety of tools you can connect:
Custom or company LLMs
Microsoft Copilot Studio and n8n agents
Design assistants like Figma Make
Coding assistants like Claude Code and VS Code
You can follow the tool-specific setup guides linked above, and for many tools, you will find the presets available once you click on ![]() Add MCP Client.
Add MCP Client.
From there, setting up a custom MCP client happens in two stages:
A Condens Admin configures the client and sets access permissions for their workspace.
Each authorized user connects the client individually from their own account.
The steps outlined below work for any custom MCP server, including connecting to custom or company LLMs.
Stage 1: Admin enables the MCP on workspace-level
In Condens, an Admin needs to:
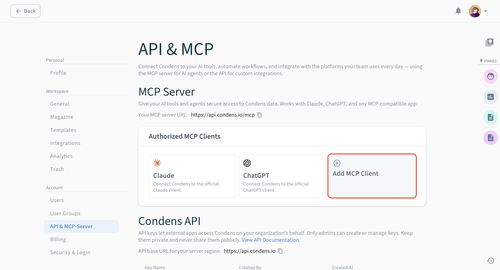
Go to Settings > Account > API & MCP Server and click Add MCP Client.
Enter client details:
Client name: The name that will appear in your authorized apps list
Logo: Upload a logo to help users identify the client easily
Description: Add a short description displayed on the app card (visible to users when browsing authorized apps)
Enter the OAuth2 redirect URI where your service sends users after login. This is required for the authorization flow to work correctly.
For in-house LLMs, consult your development team
For public clients, contact us at hello@condens.io.
If your client uses dynamic redirect URIs, see Redirect URI wildcard support below.
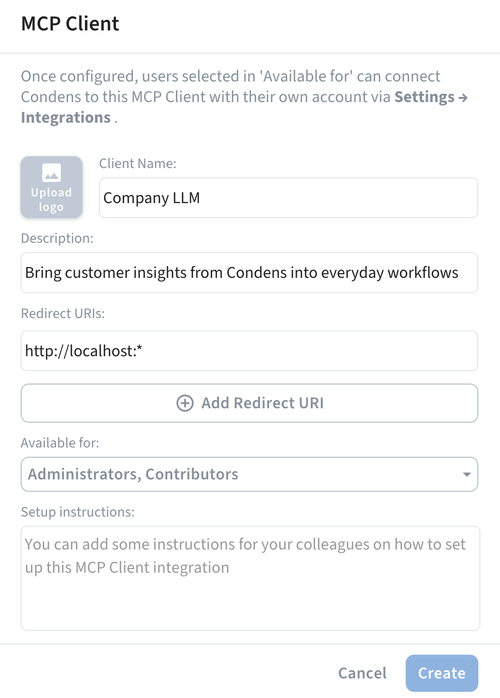
Configure which users, roles, or user groups can use this MCP client. Only authorized users will see this client in their Integrations list.
Add setup instructions for your team:
Write step-by-step instructions explaining how to connect to this client.
These instructions appear in Settings > Integrations for authorized users
Tip: Include any necessary URLs, configuration details, or troubleshooting tips.
Click Create.
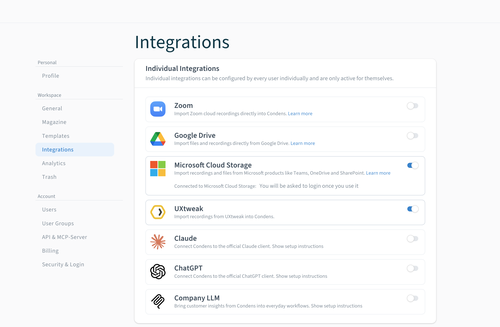
Once saved, the custom MCP client will appear in the authorized apps list and in Integrations for users who have permission to use it.
Stage 2: Each user authorizes the MCP client for their account
As the final step, each user needs to individually connect the MCP client to their Condens account.
In Settings > Integrations, you'll find the setup instructions provided by the Admin by clicking Show setup instructions. Please bear in mind that the authorization itself happens in the MCP client, not in Condens.

The toggle next to the MCP client in Integrations shows the connection status. If it's off, the authorization step hasn't been completed yet. Once you've authorized Condens in your MCP client, the toggle will automatically turn on.
Creating a dedicated user account to connect with MCP server
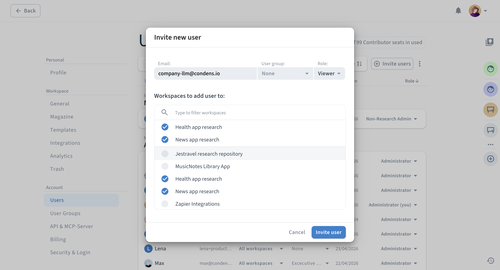
Instead of connecting individual user accounts, you can create a single shared Condens viewer account that acts as the MCP connection for your whole company. Everyone using the LLM will see the same Condens content, scoped to whatever that account has access to.
This works well when you want centralized, curated access or when managing individual authorizations isn't practical. Unlike individual integrations, access cannot be managed or scoped on a per-user level; everyone using the LLM sees the same Condens content.
This is done in three stages:
Create a dedicated Viewer account and set its access permissions.
A Condens Admin configures the client and sets access permissions for their workspace.
Then, each authorized user connects the client individually from their own account.
Stage 1: Create a dedicated Viewer account
Create a dedicated Condens user account with a generic email like company-llm@yourcompany.com or research-bot@yourcompany.com
Set the user role to Viewer (this doesn't require a paid seat).
Configure access permissions for this account. Grant access only to the workspaces and projects you want exposed through the LLM.
Use multiple Magazines to create curated views, like a "C-Level Insights" Magazine for executive summaries or product-specific Magazines for different teams. Only publish content you want accessible company-wide.
Stage 2: Admin configures the MCP client
In Condens, an Admin needs to:
Go to Settings > Account > API & MCP Server and click Add MCP Client (or open the pre-configured Claude or ChatGPT client).
Enter the client details:
Client name: The name that will appear in your authorized apps list
Logo: Upload a logo to help users identify the client easily
Description: Add a short description displayed on the app card (visible to users when browsing authorized apps)
Enter the OAuth2 redirect URI for your service. If your client uses dynamic redirect URIs, see Redirect URI wildcard support below.
In the Available for field, add only the dedicated Viewer account you created in Stage 1.
Add setup instructions for your team:
Write step-by-step instructions explaining how to connect to this client.
These instructions appear in Settings > Integrations for authorized users
Tip: Include any necessary URLs, configuration details, or troubleshooting tips.
Click Create.
Stage 3: Each user authorizes the MCP client
Because all users connect through the shared Viewer account rather than their own, the authorization step works a little differently here.
Each user needs to:
Open an incognito window or log out of their personal Condens account.
Log into Condens using the shared Viewer account credentials.
Go to Settings > Integrations and click Show setup instructions that the Admin prepared for this MCP client. The toggle next to the MCP client in Integrations shows the connection status. If it's off, the authorization step hasn't been completed yet.
Complete the authorization in the MCP client following the instructions provided.
Once authorized, the toggle next to the MCP client in Integrations will turn on automatically. Each user only needs to do this once. This gives your custom or internal LLM access to select data in Condens, regardless of whether users of that LLM have Condens accounts.
Redirect URI wildcard support
Redirect URIs may include a single trailing wildcard (*). This allows clients with dynamic redirect URIs (like Copilot Studio) to be authorized using a common prefix. The wildcard must appear only at the end of the URL and matches any characters after the prefix.
Example pattern: https://custom-llm-client.app/connector/*
This would allow redirect URIs such as:
https://custom-llm-client.app/connector/a891k2
https://custom-llm-client.app/connector/b1271k
Working with dynamic localhost ports
If you're connecting a local MCP client where the port number changes on each run (common in local development setups), use the localhost wildcard as your redirect URI:
http://localhost:*http://127.0.0.1:*
And if you also need to include localhost without a port number, we recommend adding:
http://localhost/
http://localhost
http://127.0.0.1/
http://127.0.0.1
This matches any localhost address regardless of port, so you don't need to update the redirect URI each time the port changes.
Check the MCP servers directory for more available integrations.
