
Conducting UX Research via Zoom
It’s probably no surprise to you that Zoom is the #1 video meeting application out there, but did you know the platform is also extremely popular among user researchers to conduct moderated studies? In fact, around 60% of researchers use it for their research according to the latest State of User Research Report by our friends from User Interviews.
The advantages of using Zoom are obvious: Hundreds of million people worldwide have installed the app on their devices and already know how to use it. For user research studies that means minimal friction for tool set-up and less room for errors.
In addition, Zoom is extremely reliable and stable, even with a less than perfect internet connection. And lastly, the free version is already powerful with the paid version being quite affordable at around $15/month.
In this hands-on article, we go into the details of setting up Zoom for your remote user research and show some practical tips. We’ll start off with the preparation and basic settings that always apply and then tackle the specifics of the different types of studies one by one.
Get our Zoom settings cheat sheet for UX Research as a PDF.
Before we dive in a few words about Zoom’s pricing plans: The free plan includes unlimited one-on-one meetings and might be all you need. The most relevant limitations of this plan for UX research are
Group sessions with more than two people are limited to 40 minutes
Cloud recording isn’t available
Transcription isn’t available
Group sessions and cloud recording are available in the Pro plan ($15/month) and transcription is included in the Business plan ($20/month). You can also use dedicated transcription and analysis tools - a topic we’ll cover in the analysis section.
Basic settings & preparation ⚙️
Firstly, you need to know that there are three levels of settings in Zoom:
Account settings
User settings
Settings for an individual meeting
Note: If your organization manages your account you probably can’t access the account settings and may need to contact your admin to edit certain settings on the user-level.
Make sure to check these settings upfront as most of them can't be adapted once a meeting is running. We’ll now go through the most important user settings (go to Zoom settings). For the full list of setting recommendations download our settings cheat sheet as PDF.
Settings for participant access
Accessing the session should be as easy and smooth as possible for the participant. Here is how you achieve that:
Activate the Embed passcode in link for One-click join option. This reduces the friction when joining as the participant doesn’t have to enter the passcode manually.
Use the waiting room feature so that participants will come to a waiting room first and have to be admitted to the meeting by the host. This avoids that participants join before the host or that they join early while a previous session is still running.
Depending on your study you may want to activate Allow to join via browser. This feature doesn’t require participants to download the Zoom app which might be a barrier in itself. Some people may not be able to install or run the Zoom app on their device and you’d exclude them if the browser isn’t an option. However, functionality might be limited when participants use the browser, especially on Safari (see overview of browser limitations here).
Settings for stakeholder access
You might have co-workers or clients who join research sessions to support, for example with note-taking, or just to listen in. These are the settings we suggest for this scenario:
Activate the co-host option if you have someone supporting you to manage the session. Co-hosts can admit participants or start/pause the recording so you can focus on facilitating. Also, check the alternative host option in the paragraph on scheduling the call.
With the waiting room settings, you can allow colleagues to skip the waiting room. This works by adding your organization’s domain to the respective option (in our case that would be condens.io). This means less work for you as a host as you don’t have to admit observers manually.
When inviting observers to Zoom sessions, it's a challenge not to disturb the participant. It may be distracting if stakeholders enter and potentially exit the call. In addition, a participant may become too aware of the fact that they are being watched which can be uncomfortable or even bias their behavior. To mitigate these effects:
Turn off sound notification when someone joins or leaves the room
Make sure to activate Mute all participants when they join and turn off participants video upon joining
Here’s a tip from Alex Bailey about this part:
„I introduce stakeholders as "teammates" and stay away from using their formal titles to create a more humane atmosphere.“

Pro tip: An alternative solution to let stakeholders observe without disturbing participants is Zoom’s Webinar solution. Several researchers confirmed that they used it successfully for their studies - see the LinkedIn thread here. And although Webinar comes at an extra cost of around $40/month it lets stakeholders observe without showing up on the meeting participant list.
Please note that it’s of course still necessary to let the participants know that there are people observing the session if you use Zoom Webinar.
Settings for in-meeting experience
We now get to the settings that affect the possibilities during the session itself. So here we go:
The Chat is useful to communicate with participants e.g. while they set up the audio connection or to send links to tests they can open on their device. Ask stakeholders to use private chat to communicate with you or use an entirely separate chat tool like Slack or MS teams to not distract the participant.
A handy tool for communication is annotation. It lets anyone add visual marks on a shared screen to point to a certain part of a prototype or to visualize an idea. As a host, you can save or delete any annotations and also disable this feature during the meeting.
Closed captioning shows the spoken conversation of the meeting as text and can help participants follow the conversation more easily. Especially for participants hard of hearing this can be a crucial accessibility feature. You can assign someone to type captions or use Zoom’s live transcription which is currently available in English. The accuracy won’t be perfect and depends on a range of factors but is quite good in many scenarios. Once the host activates captioning during the meeting it’s visible for every participant, but one can hide it individually.
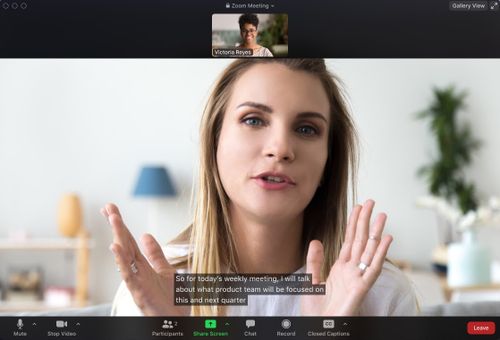 The live transcription shows the spoken words as text on the screen.
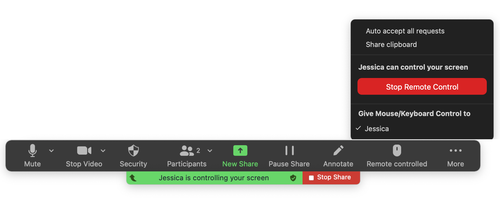
The remote control feature allows you to take control of the participant's mouse on their desktop - after they gave permission of course. This can be useful to set up tests on their desktop or to help the participant if they are stuck. You can also use it in reverse to let the participant control your mouse and conduct a study on your device. The remote control only works for the native Zoom app on desktops or iPads - mobile phones and browsers aren’t supported.
Recording
Even if you have someone to take notes during the session it’s good to have a recording in case you missed something. And if you’re on your own you definitely want to record so you can fully focus on the session. How to configure recordings for research sessions:
Zoom offers two ways of recording: locally on your machine or in the cloud. While cloud recording is only available with the paid plan it might be the cleaner solution from a privacy perspective as your local machine is yet another place where personal data is stored. In addition, data tends to be better protected on Zoom’s data centers with all their security features and backups. If you’re on your organization’s Zoom account be sure to check whether cloud recordings are shared with others to comply with privacy guidelines.
If you tend to forget recording the automatic recording option is helpful, but in this case you need to ensure the participant gave consent before the meeting starts as the recording immediately commences.
Transcripts from recordings are available for Zoom Business and Enterprise accounts. Learn more about transcripts and analyzing recordings in the respective section below.
Scheduling the call
Let’s now have a look at what to consider at the individual meeting level. One basic question is whether you want to schedule a separate Zoom meeting for every research session or just use one for all sessions. While both are possible, having just one meeting can save you and your stakeholders time switching if you have multiple sessions a day in quick succession.
We recommend assigning someone from your team as the alternative host for the meeting so in case you can’t make it to the session for some reason there’s still a backup. The alternative host can start the meeting and then facilitate the session. Should the original host join the call later the alternative host will become a co-host.
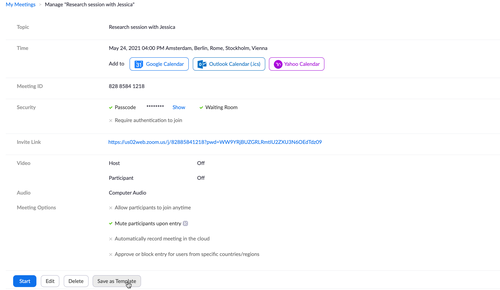
You can save templates with meeting settings so you can reuse them for future calls. Note that this is only available when scheduling through the browser. After you click "Save" to schedule a meeting you’ll find the Save as template option on the meeting information page.
If you're using a recruiting tool, you can check if they also offer scheduling features. User Interviews, for example, offers calendar syncing and a Zoom integration that lets you automatically create and share meeting links with participants and moderators.
An important aspect of preparation is providing participants with the information they need to feel safe and to minimize the chance of technical failure. We’ve summarized this in four steps:
Send them a calendar invite and include the one-click link for the Zoom meeting. You can automate this step by using a scheduling tool.
Let participants test their technical setup with Zoom’s test meeting available at https://zoom.us/test. You can add this to the invitation asking the participants to run a quick test in advance.
Let participants know what to expect: Will they have to share their screen and/or open a prototype on their device? Will you record the session and what exactly (audio, camera, screen)? Will stakeholders be there to observe? Avoiding surprises will increase the chance of a successful session.
Get consent either prior to or at the beginning of the meeting.
Also remember to send invites for the sessions to internal stakeholders like co-workers or clients, too.
Once the call starts
If not happening automatically remember to start recording after the participant gave consent. Pausing the recording and resuming at a later point is always possible.
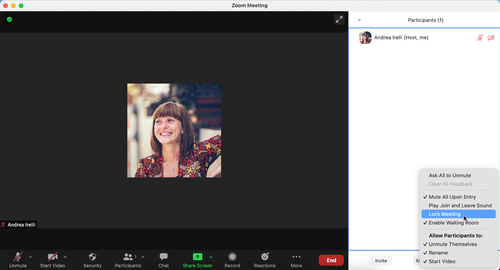
You can lock the meeting, for example, to avoid stakeholders joining late and disturbing the session. This is available if you open the Participants sidebar, go to More and then select Lock Meeting.
Now you know the basics of conducting user research via Zoom. In the next step, we’ll look at the particularities of certain types of methodologies and devices.
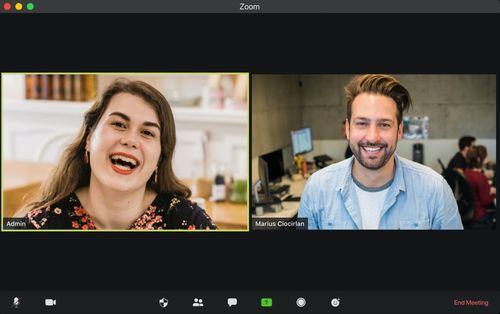
Moderated interviews on desktop 👩🏼💻🧑🏾💻
With the settings above in place, conducting a moderated interview via Zoom is quite straightforward.
You can find relevant options like recording or the chat in the control bar. If you can’t see a certain option then it’s probably hidden behind the More button.

If the participant has trouble finding the audio or video connection you can request them to connect by clicking on their name in the participant list. The request to activate their audio or video will pop up on their screen and they can activate it with one click.
Moderated tests on desktop 🖥
We’re looking at two types of tests for desktop applications here because the setup can be slightly different:
A prototype test during which you only show a prototype to participants but it doesn’t require interaction. This method is often used with early-stage prototypes
A usability test where participants directly interact with the interface of an application
Prototype test
Here, you can just pull up the prototype, share your screen and walk participants through it. Note that certain interactions (for example drag & drop) might be limited if you only share one application. In this case, it’s better to share your entire desktop. Also, make sure the scale of the window you share is large enough for participants to see and read what’s on the screen. Especially if you work on a larger screen than your participant, images or text appear smaller for them.
Once you share your screen you can also activate the annotation feature so the participant can point to certain areas for comments or feedback.
Usability test
If you need the participant to interact with an interface directly there are two ways to do that:
Option 1: Let participants conduct the test on their own device
Give them access to the test e.g. by sending a link through the chat and ask them to share their screen. The annotation feature can help to guide participants if they have questions. You can also use the remote control to bring up the test on the participant’s device or help them out if they are stuck. Be careful: Letting someone else remote control your mouse can feel scary, so doublecheck with the participant if it’s ok for them.
Option 2: Let participants remote control your screen
This is useful if you don’t want to share out the test, if the test is difficult to access or if the participant doesn’t want to/can’t share the screen of their device. You have to share your screen first and then choose the Remote Control option from the control bar and select the participant from the list. Don’t worry, you can take back control any time via the control panel or the shortcut Ctrl+Shift+G (on Mac) or Alt+Shift+G (on Windows).
Moderated usability tests on mobile: iOS 📱🍏
Before the session, ask the participant to download the Zoom iOS App and to join the meeting by opening the invite link on their mobile device. For easy screen sharing, the participant’s device needs to have iOS 11 or higher.
Upon entry, the participant is asked to connect their audio. Controls on the iOS device are similar to those on the desktop. The participant can turn on the camera and microphone with the controls in the lower left. Screen sharing can be started with the green arrow in the middle and it’s possible to either share the entire screen or a single application. The following video shows what it looks like from the participant's perspective.
Ask participants to activate “Do not disturb” to avoid unwanted notifications popping up. They do this by swiping down from the top right corner of the screen and selecting the moon icon. Annotation on the participant’s mobile device and controlling the mobile device aren’t possible for you as a meeting host, but participants can annotate their own screen.
Moderated usability tests on mobile: Android 📱🤖
Ask the participant to download the Zoom Android App. Clicking the meeting link on their mobile device will open the Zoom app. Again the controls are very similar to what we know from desktops. Activating “Do not disturb” on Android works by swiping down from the top of the screen and selecting Do Not Disturb. This is what the participant will see:
Just like with iOS, annotation is only possible for the participant but not the host.
Analyzing research data 🧐
After the sessions are done the next step is obviously to analyze the data and the Zoom recordings are a good starting point. Getting automatically generated transcripts is extremely useful for the analysis and saves a lot of time. Zoom offers transcripts for English in their Business and Enterprise plan.
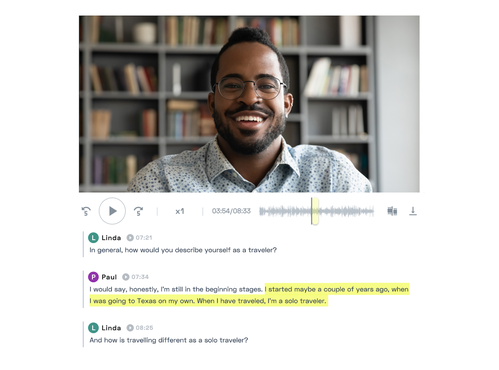
Dedicated research tools also provide transcripts from Zoom recordings in multiple languages. For example with Condens, you can import Zoom recordings easily with the dedicated Zoom integration (read here how to activate it) and get transcripts in a few minutes. The advantage here is that you can immediately start with the analysis by highlighting parts on the transcript and adding tags to categorize evidence. The timestamped transcript makes it easy to extract clips and stitch together highlight videos with drag & drop to share with stakeholders.
If your stakeholders couldn’t join the sessions personally you can set up a joint analysis session afterward. Our friends from Freeletics like to pull the notes or transcripts on a large screen and then go through it together, tagging and discussing findings - see how they do it here.
Want to read more? Check out the articles about user interview analysis and using the power of video when sharing qualitative research findings.

Alex is the CEO and Co-founder of Condens. He started his career as a product manager, and interviewed more than 160 UX Researchers from around the world to identify pain points and find opportunities for improving research processes before founding Condens. He is particularly passionate about Research Ops, creating effective Product teams, and he often speaks at UX Research events.
