Analysis
From raw data to insights — spot patterns, connect dots, and uncover what matters.

Usability testing is often the starting point for beginner researchers. So, there's no doubt you know about its importance in creating user-friendly products. But what if you want to improve your practice?
In this article, we'll share 13 tips to help you take your moderated usability testing skills to the next level. Whether you're an experienced user researcher or just starting out, these tips will help you conduct more effective and insightful usability tests. We've split our best practices into three stages – before, during, and after – to cover all the essential steps for acing your usability testing.
Let's dive in when you're ready to level up your usability testing skills!
The product prototype probably comes to mind first when planning a usability test. However, how do you make sure your prototype is good enough for testing? Ask yourself a few questions to determine whether your prototype is ready to be tested.
First, is the prototype representative of the final product? If it differs from the final product significantly, such a prototype may not reflect the use cases you’d like to validate. Ideally, your prototype should reflect your Minimum Lovable Product (MLP).
Second, have you identified the critical user scenarios and tasks you want to test? Ensuring the prototype adequately represents the use cases and scenarios is crucial for effective usability testing.
Finally, in case you had previous testing rounds, have you incorporated user feedback and made relevant changes? Iterating on previous testing results can help to refine the prototype and make it more representative of user needs.
By considering these factors, you can be sure your product prototype is suitable for usability testing and generate valuable insights to improve the user experience.
„Say you’re trying to test whether people like pizza. If you serve them burnt pizza, you’re not getting feedback on whether they like pizza. You only know that they don’t like burnt pizza. Similarly, when you’re only relying on the MVP, the fastest and cheapest functional prototype, you risk not actually testing your product, but rather a poor or flawed version of it.“

One of the most frequently asked questions around usability testing is about finding the right sample size. According to Jakob Nielsen, the co-founder of the Nielsen Norman Group, it’s best to start with a modest user sample size.
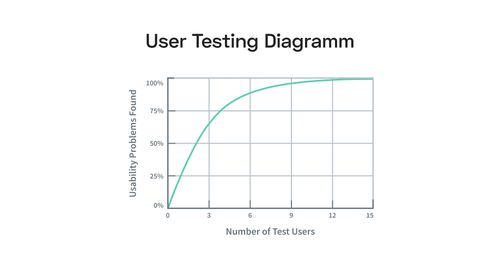
You can run high-quality usability tests with a small sample size of just five users. Skeptical? There is data to back this up. For example, you can detect over 75% of usability issues with only five testers. If your group had 15 users, that number would increase, and you would likely detect 100% of usability issues. To illustrate that, check out the graph below.
However, if you’re on a tight budget and running one usability testing session with 15 users versus organizing three tests with five users, opting for the latter is a better idea. There are only a few exceptions to this rule – when running a quantitative study or having several distinct user segments. No worries: we discuss both of these cases later.
Imagine you're testing out a home-sharing platform like Airbnb. The platform is used by a wide range of users of different ages, from young adults to seniors. However, these users may have different expectations and goals when using the app. For instance, younger users might prioritize trendy neighborhoods near vibrant nightlife and entertainment venues, whereas older users may seek tranquility and serenity in their preferred location. Additionally, users have different budgets for in-app purchases, with some opting for a more affordable accommodation option and others willing to pay more for a luxurious and comfortable stay. By considering these different user groups and their unique needs and expectations, you can create a more effective usability testing plan for the Airbnb platform that caters to the broad range of users.
If your sample includes only five testers, three young adults, and two seniors, then your sample is too small. Secondly, it’s not varied enough to reflect the platform user groups.
For each separate user persona, make sure to bring three to four testers on board. In this case, you’d want to engage the help of three to four young adult users and three to four seniors. This way will allow for more accurate, balanced testing data.
Okay, you’re sure your prototype is ready for testing, and your study sample size is reasonable. Now it’s time to reflect on how you conduct a usability test.
Obtaining an honest product opinion is one of the key components of usability testing. To that end, you’ll want to build a good relationship with whoever tests it. Doing so will make the person testing the product comfortable enough to provide genuine feedback.
Building rapport will look different for everyone, but creating a relaxed and welcoming atmosphere doesn’t have to be complicated.
Start the session by introducing yourself, thanking the participant for their time, and explaining the purpose of your session. Make sure that the participant understands what you hope to achieve. As a result, they will feel more invested in the process.
Listen actively and ask open-ended questions. Make the person feel at ease. Generic questions might be anything from asking them what some of their interests are to what they do for work. Get to know your tester a bit, and you’ll help eliminate any feelings of stress or uncertainty on their part.
Use positive reinforcement. If your participant shares a valuable insight, acknowledge it and thank them for sharing. They will be encouraged to continue sharing their thoughts and feelings throughout the test.
What is your automatic reaction when you hear the word ‘test’? Many of us are not generally keen on hearing the term as it creates feelings of anxiousness. Subconsciously, we tend to associate it with more negative outcomes, fearful that we might “fail” the test.
Rather than calling it usability testing, UX Consultant David Hamill recommends referring to it as a ‘study’ — a quick fix that will make participants feel more relaxed when sharing insights. Find an example of how he handles it below.
„One of the techniques I use is called a Usability Study and that's what we're doing today. This is where I ask people who are the target users of a website or software and I ask them to pretend they are in a situation in which they would need to use it. By observing how you use it and in particular what things get in your way, I can advise the team who built it, how to make it work better for the people who do use it...“

Once you’ve established a comfortable setup, ask your participants what they think the product does. Irrespective of what you're testing, whether it be an application or a website, consider running a blink test.

A blink test is when you show participants a screen for a few seconds and ask them what details they remember about it. What grabbed their attention? Was it a font choice? Was it the cool graphics or, maybe, the layout? Running a blink test will help you identify what stands out most to certain people.
Also, run an expectancy test to see how users react to different elements such as icons or various graphics. You can ask them what they think would happen if they clicked on a specific button or scrolled to a different part of the page. This will help you better understand their first impressions.
Ultimately, you should never assume that you know what the participant is thinking about the page in front of them. Avoid providing hints or leading your participants to specific areas or features. Instead, encourage them to think aloud throughout the session, sharing their thoughts, expectations, concerns, and any confusion they may experience. This approach will help you avoid typical researcher biases.
Overwhelming your users with complex tasks from the get-go will be counterproductive. They might feel discouraged if given too much information upfront.
By starting with simple tasks first and progressing from there, your users will ease into the session. For example, one simple task for a mobile application could be “Find and add a product to your shopping cart.” or “Change your account password.”. The more familiar they become with the product, the more complex tasks they will be able to accomplish and the more detailed their feedback will become. With that in mind, avoid including too many questions – it’s a good idea to cap your test at the one-hour mark.
After a task is completed, another useful practice is asking to rate the task simplicity. You can use a scale from 1-5: with ‘1’ being extremely difficult and ‘5’ being smooth sailing. Simply ask testers how easy they found the task and why.
By using a mixed method approach to data collection (quantitative and qualitative) you’ll be able to dig deep to the heart of the problem. While the quantitative method will tell you about the seriousness of the issue, the qualitative one will let you in on the reasons behind it.
Let’s look at one example. If only one person out of 25 testers had an issue with completing the task of "Finalizing payment via credit card" then that's likely an isolated event. But if 15 people came across it, then you're facing a recurring usability issue that needs to be addressed. You can use follow-up questions to understand why users struggled with a task, and use their insights to improve the user journey.
If you’re using a dedicated UX Research tool, like Condens, you can bring qualitative and quantitative data from a test session to one place to analyze what you’ve gathered.
This particular tip is to help avoid collecting biased opinions when figuring out how to do user testing. You’ve been working on the design with a team, so your professional knowledge will of course impact your own opinions. By interacting too much with testers, you risk implementing your own ideas into the minds of users.
Don’t ask leading questions such as “don’t you think this design layout is straightforward?” or “don’t you reckon these graphics are eye-catching?”. Your own biases should not come through during the testing process. Ask questions only when necessary. Avoid the potential for leading statements by writing out questions beforehand and following through with your pre-written list.
Since a lot of data gets collected during a testing session, it can be difficult to remember every detail. The best practice is to have a note taker alongside you, but that might not always be possible.
If not, using both audio and video recording helps eliminate time-intensive, inefficient note-taking and focus on the users instead during the session. Utilizing recording technology lets you return to the session in your own time for reference.
Like with anything else, practice makes perfect. It takes time to get good at preparing, moderating, and analyzing the results of usability testing sessions. So, if you’ve forgotten to ask a question, went off script a little too far, or missed a usability issue in your analysis, don’t be too hard on yourself.
David Hamill, who’s run numerous tests in his UX career, admits to having asked “a bunch of massively leading questions''. The key is to acknowledge these mistakes and try to prevent them from happening in the future.
You don’t want to make the test last longer than necessary. It’s better to run a few shorter ones instead. Three to five tests are better than asking a multitude of questions at one go. Why is this? Multiple tests with fewer questions allow space for proper data gathering and don’t overwhelm the respondents as much. They let you collect enough insights to make improvements already and use the improved version in the next testing round.
Also, if needed, you can run additional tests on the revised versions of your product, on an ongoing basis.
After you’ve completed usability testing, turning to a transcription tool will help you cut down on time spent sifting through your notes. Transcription tools will help turn your video or audio recordings into text. While general voice or video-to-text software exists, using a dedicated UX research tool, such as Condens, gives you further opportunities of analyzing, sharing, and storing your research data and insights.
It automatically turns your recordings into text, making it:
Searchable – you don’t have to remember which user shared which remark, and around which minute of the video. You simply type in a keyword and it takes you to the right part of the transcription. Plus, you get the option to play the corresponding part of the recording.
Organized – you can drag and drop multiple highlights of recordings into a common cluster. It’s very much like adding video post-its to a thematic board.
Collaborative – your entire team can add notes and comments to specific parts of the usability test, which will make it easier to agree on the next steps.
For example, you can decide to implement improvements in the upcoming iteration or run the same assignment in your next usability testing session to see if the same issue will come up again. You also have the option to store your findings in the “Documented” clusters for future reference. Analyzing the usability test data in a dedicated tool, will allow you to quickly show off product development and compare different stages in the future.
Overall, using a transcription tool makes your entire process more streamlined and effective.
Usability testing is a fundamental user research method and the starting point for many novice researchers. However, if you wish to refine your research practice further, here are the key usability testing best practices you should remember:
Ensure your prototype reflects your Minimum Lovable Product (MLP)
Don’t overdo it with the number of questions, follow an interactive approach instead.
Make sure to build a good rapport with your testers.
Start with simple tasks, and ask your users to rate their intuitiveness.
Use the right tools to make usability testing a little easier.

Anna is a Product Marketing Specialist at Condens. Coming from a B2B tech startup and having an academic background in consumer technology adoption behavior, she is passionate about driving software products and exploring how people use them. Anna contributes to the UX Research community with content in all formats from long-form articles or snackable social media takeaways to organizing in-depth user research talks, always focused on finding new angles and providing useful input.